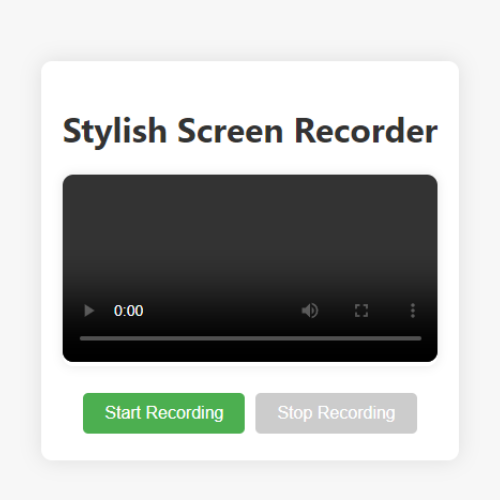
Crafting A Custom Screen Recorder Using Html, Css, And Javascript

Introduction:
In the ever-changing field of web development, developing customized tools can improve your knowledge of different technologies. We'll walk you through the process of creating a screen recorder in this tutorial using HTML, CSS, and JavaScript—the core three web technologies. After completing this tutorial, you should be able to incorporate a lightweight, working screen recorder into your web projects.
Setting Up the HTML Structure:
Let's begin by establishing the HTML structure for our screen recorder. This serves as the foundation for our application, providing the necessary elements for user interaction and video display.
<!DOCTYPE html>
<html lang="en">
<head>
  <meta charset="UTF-8">
  <meta name="viewport" content="width=device-width, initial-scale=1.0">
  <link rel="stylesheet" href="styles.css">
  <title>Stylish Screen Recorder</title>
</head>
<body>
  <div id="app">
    <h1>Stylish Screen Recorder</h1>
    <div class="recording-container">
      <video id="recording" controls></video>
    </div>
    <div class="button-container">
      <button id="startBtn">Start Recording</button>
      <button id="stopBtn" disabled>Stop Recording</button>
    </div>
  </div>

  <script src="script.js"></script>
</body>
</html>
Designing the Styles (styles.css):
To ensure a pleasant user experience, let's add some style to our screen recorder. Customize these styles based on your preferences and the overall aesthetic of your web application.
body {
    font-family: 'Segoe UI', Tahoma, Geneva, Verdana, sans-serif;
    display: flex;
    align-items: center;
    justify-content: center;
    height: 100vh;
    margin: 0;
    background-color: #f7f7f7;
  }

  #app {
    text-align: center;
    background-color: #fff;
    border-radius: 10px;
    padding: 20px;
    box-shadow: 0 0 20px rgba(0, 0, 0, 0.1);
  }

  h1 {
    color: #333;
  }

  .recording-container {
    overflow: hidden;
    border-radius: 10px;
    box-shadow: 0 0 10px rgba(0, 0, 0, 0.1);
    margin: 20px 0;
  }

  video {
    width: 100%;
    max-width: 600px;
    border-radius: 10px;
  }

  .button-container {
    display: flex;
    justify-content: center;
  }

  button {
    font-size: 16px;
    padding: 10px 20px;
    margin: 5px;
    cursor: pointer;
    background-color: #4caf50;
    color: #fff;
    border: none;
    border-radius: 5px;
    transition: background-color 0.3s;
  }

  button:hover {
    background-color: #45a049;
  }

  button:disabled {
    background-color: #ccc;
    cursor: not-allowed;
  }
Implementing the JavaScript Logic (script.js):
Now, let's add the functionality to start and stop the screen recording. This JavaScript code integrates with the HTML and CSS to make our screen recorder fully operational.
document.addEventListener('DOMContentLoaded', () => {
    const startBtn = document.getElementById('startBtn');
    const stopBtn = document.getElementById('stopBtn');
    const recordingVideo = document.getElementById('recording');
    let mediaRecorder;
    let recordedChunks = [];

    async function startRecording() {
      const stream = await navigator.mediaDevices.getDisplayMedia({ video: { mediaSource: 'screen' } });
      mediaRecorder = new MediaRecorder(stream);

      mediaRecorder.ondataavailable = (event) => {
        if (event.data.size > 0) {
          recordedChunks.push(event.data);
        }
      };

      mediaRecorder.onstop = () => {
        const blob = new Blob(recordedChunks, { type: 'video/webm' });
        recordingVideo.src = URL.createObjectURL(blob);
        recordedChunks = [];
      };

      mediaRecorder.start();
      startBtn.disabled = true;
      stopBtn.disabled = false;
    }

    function stopRecording() {
      mediaRecorder.stop();
      startBtn.disabled = false;
      stopBtn.disabled = true;
    }

    startBtn.addEventListener('click', startRecording);
    stopBtn.addEventListener('click', stopRecording);
  });
Note: if you want to download the video then after downloading you will convert it into .mp4.
Congratulations! You've successfully created a custom screen recorder using HTML, CSS, and JavaScript. This project not only provides a practical solution for capturing screen content but also serves as a valuable learning experience for anyone looking to delve deeper into web development. Feel free to explore additional features and optimizations to further enhance your screen recorder or incorporate it into your future projects.