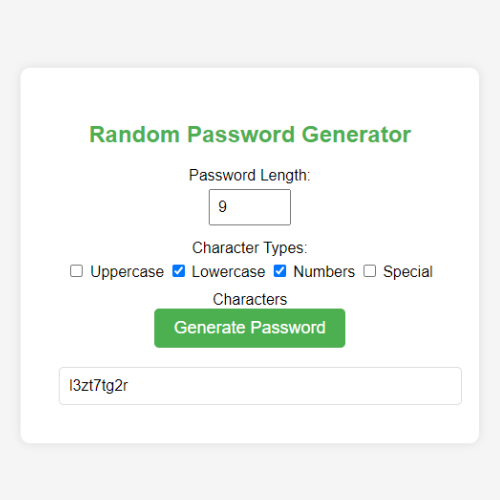
Building A Secure Password Generator With Html, Css, And Javascript

Online security is crucial in the digital age, and the first line of defense against cyberattacks is to create strong, one-of-a-kind passwords. Creating a password generator tool enables users to quickly and easily create secure, complicated passwords. We'll walk you through the steps of creating a reliable password generator with HTML, CSS, and JavaScript in this tutorial.
1. Setting Up the HTML Structure:
Start by creating the basic structure of your password generator. Define the input fields for password length and character types, along with a button to generate the password.
<!DOCTYPE html>
<html lang="en">
<head>
    <meta charset="UTF-8">
    <meta name="viewport" content="width=device-width, initial-scale=1.0">
    <link rel="stylesheet" href="styles.css">
    <title>Random Password Generator</title>
</head>
<body>
    <div class="container">
        <h1>Random Password Generator</h1>
        <label for="length">Password Length:</label>
        <input type="number" id="length" min="4" max="50" value="12">
        <br>
        <label>Character Types:</label>
        <input type="checkbox" id="uppercase"> Uppercase
        <input type="checkbox" id="lowercase"> Lowercase
        <input type="checkbox" id="numbers"> Numbers
        <input type="checkbox" id="special"> Special Characters
        <br>
        <button id="generateButton">Generate Password</button>
        <br>
        <input type="text" id="password" readonly>
    </div>
    <script src="script.js"></script>
</body>
</html>
2. Styling with CSS:
Style the password generator to make it visually appealing and user-friendly. Use CSS to define the layout, colors, and animations.
body {
    font-family: Arial, sans-serif;
    display: flex;
    justify-content: center;
    align-items: center;
    height: 100vh;
    margin: 0;
    background-color: #f5f5f5;
}

.container {
    text-align: center;
    background-color: #ffffff;
    border-radius: 10px;
    box-shadow: 0 0 10px rgba(0, 0, 0, 0.1);
    padding: 40px;
    width: 80%;
    max-width: 400px;
}

h1 {
    color: #4caf50;
    margin-bottom: 20px;
    font-size: 24px;
}

label {
    display: block;
    margin-bottom: 5px;
}

input[type="number"], input[type="checkbox"] {
    margin-bottom: 15px;
    padding: 8px;
    font-size: 16px;
}

button {
    padding: 10px 20px;
    font-size: 18px;
    background-color: #4caf50;
    color: white;
    border: none;
    border-radius: 5px;
    cursor: pointer;
    transition: background-color 0.3s;
}

button:hover {
    background-color: #45a049;
}

#password {
    margin-top: 20px;
    padding: 10px;
    font-size: 16px;
    width: 100%;
    border: 1px solid #ddd;
    border-radius: 5px;
}
3. Implementing Password Generation with JavaScript:
Now, let's add functionality to your password generator using JavaScript. Define a function to generate the password based on user input for length and character types.
document.getElementById("generateButton").addEventListener("click", function() {
    const length = document.getElementById("length").value;
    const uppercase = document.getElementById("uppercase").checked;
    const lowercase = document.getElementById("lowercase").checked;
    const numbers = document.getElementById("numbers").checked;
    const special = document.getElementById("special").checked;

    const uppercaseChars = "ABCDEFGHIJKLMNOPQRSTUVWXYZ";
    const lowercaseChars = "abcdefghijklmnopqrstuvwxyz";
    const numberChars = "0123456789";
    const specialChars = "!@#$%^&*()_+[]{}|;:,.<>?";

    let allChars = "";
    if (uppercase) allChars += uppercaseChars;
    if (lowercase) allChars += lowercaseChars;
    if (numbers) allChars += numberChars;
    if (special) allChars += specialChars;

    let password = "";
    for (let i = 0; i < length; i++) {
        const randomIndex = Math.floor(Math.random() * allChars.length);
        password += allChars[randomIndex];
    }

    document.getElementById("password").value = password;
});
In this password generator, users can specify the password length and choose character types (uppercase letters, lowercase letters, numbers, and special characters) using checkboxes. When they click the "Generate Password" button, a random password meeting their criteria will be displayed in the text input field. The tool provides a simple and intuitive interface for generating strong and secure passwords tailored to user preferences.
Feel free to further customize the design and functionality according to your preferences and requirements. Happy coding!